Archive for June, 2012

June 26, 2012

Apple Upside Down Cake

by 田草川(たくさがわ)かおる

Hi this is KK, Sushi Artist/ Healthy Muffin Maker / Mum 🙂

Thank you for visiting my blog.


I have a very bad habit of scribbling recipe ideas on a piece of paper and letting them go everywhere, and today, I decided to save some everyday recipes so that I know where to look for them next time: on my own blog!


Most of the recipes are tested more than three times, so I know the ingredients and methods by hand and taste, but the little hints I take for myself are quite handy sometimes, especially making alterations.


This apple upside down cake was prepared for one of my bake sales, and since I didn’t have any cake tins, I used milk cartons! But it came out fine 🙂 It is meant to be made with 9inch(22cm)square tin, but if you don’t have it (like me), you can make it from 3 milk cartons 🙂

Or, just use 1/3 of the ingredients and make 1 milk carton size cake.


Ingredients (for 3 milk cartons)


*TOPPING*

-3 apples,sliced

-1/2 cup brown sugar

-1 teaspoon cinnamon

-4 Tablespoon melted butter


*CAKE MIX*

-220g Organic plain flour

-2 teaspoon Aluminium free Baking Powder

-1 teaspoon cinnamon

-1 pinch salt

-60g Sultanas

-60g Organic raw sugar

-2 Free range eggs (Large size)

– 100g oil (I use rice bran)

-1 teaspoon Organic vanilla essence

-2/3 cup milk


Method:

Step 1 :Mix the *TOPPING* in a large bowl, line the base of tin with the apples (Make sure they cover the whole base); Preheat the oven to 180 C.
Step 2: Mix all the dry ingredients (flour, BP, cinnamon, salt, sultana, sugar) in a food processor and mix on high for 30sec, add the rest of the ingredients (eggs, oil, vanilla essence, milk) and mix on medium speed for 40-60 seconds, till the batter is smooth; Pour the batter into the tin (equal amount in each tin/carton) and bake in 180C oven for 25min, or until the skewer comes out clean.


Cool on cake wrack for 10 min before opening it onto a plate. This cake is rich in cinnamon flavor, and if you are a nut-lover like me, I do recommend to put some walnuts in the cake mix. Just chop it roughly (about your handful =30-40g) and add it in the dry ingredients.

Hope you like the recipe!


June 25, 2012

Very Easy Chickpea Cake

by 田草川(たくさがわ)かおる

Hi this is KK, Sushi Artist / Healthy Muffin Maker / Mum 🙂

Thank you for visiting my blog.

When I was organizing a bake sale to raise money for children affected by the earthquake in Japan, one of my playgroup mother told me that her daughter was allergic to flour. That makes it very difficult for her to eat cakes, so I tried to bake something  that she could eat that looked and tasted like every other sweets that is sold at a bake sale.

Yes, this cupcake is made from chickpea, and does not use any flour at all.

It is easy to make, just mix everything in the food processor and it’s done!

Just a  quick warning before you start, it does contain eggs and nuts, so it may not suit children with egg allergy and nut allergy. Also, when you are purchasing chocolate, make sure that they are gluten free. You can buy gluten free chocolate at health food shops, so just give a quick check!

Ingredients (to make 10 regular cupcakes)

-1 can Organic chick peas (when drained, about 240g)

-150g gluten free white chocolate

– 3 eggs

-100g Organic raw sugar

-50g Dried Apricots

-50g Almond meal

-1t Aluminium free Baking powder

Method

Step 1: Melt white chocolate in microwave, Heat the oven at 180C, Line baking tin with paper

Step 2: Mix all the ingredients in a food processor for 45-60sec, or until everything is combined, Divide the mixture into baking tin and bake on 180C for 15-20min, test with a skewer to make sure it’s cooked.

Simple? Yes.

Tasty? Yes.

Much sweeter than what I usually make, but the taste was yum 🙂 For Yumi, I might cut out the sugar and add extra apricots and coconuts. You can prepare your own chickpea, you would need about 1 cup cooked chickpeas(240g). Hope you like this recipe 🙂

June 25, 2012

Sushi Art Class for July 2012

by 田草川(たくさがわ)かおる

Hi this is KK, Sushi Artist / Healthy Muffin Maker / Mum 🙂

Thank you for visiting my blog.

It’s July already, school holiday season again! My Sushi Art classes are open for Mum and Kids, so if you want to bring your elder children along, please feel free to do so. Kids can roll their own sushi for additional $15/child, so why not give them a sushi rolling experience once in a while?
.
Menus for July

-Rose


-Frog (Vegan)


Dates for Classes in July 2012:11th (Wed), 12th (Thur)

Menus will change every month.

You can come with your baby/toddler and take a lesson in the same room with your child! However, as it is not a childcare facility, please look after your own child. The class will be conducted in a way so that you can alway give your baby a cuddle when they become a bit restless. If it becomes too difficult, you are welcome to observe and take a substitute class on a different day. I know what it’s like to cook with babies!

Time: 10:30-13:00 (Please stay longer if possible for sit down taste-testing time, drinks and miso soup provided with 2 slices of sushi made by me)

Place: Private home in North Shore (Address given at time of enquiry)

Cost: $50 per person (Includes ingredients, recipe to take home, sit down lunch)

Class size: 2-4 people

What to bring: Apron and a box to take home your sushi

For bookings and further enquiries: Please send me a message or leave a comment, and I’ll get back to you:-)

Thank you and hope to see you soon!

June 21, 2012

How to make your own Miso

by 田草川(たくさがわ)かおる

Hi this is KK, Sushi Artist / Healthy Muffin Maker / Mum 🙂

Thank you for visiting my blog.


It is midwinter today, and in Japan you are supposed to eat pumpkin on a midwinter day.

Also, we’ve been told to put Yuzu (a Japanese citrus that looks like lime but yellow on the outside and a bit sweeter) in out bathtubs. Both of them would keep our body warm and keep away the cold!

Today, I thought it is the right timing to mind my miso that I prepared in Feb/March.

Every year, I make my own miso, and this year I am giving it a try in Sydney for the first time.
20120621-142420.jpg Miso making is really simple. All you need is 3 ingredients.

-Soy bean

-Salt

-Koji (rice malt)


My concern was, “I wonder if I can buy Koji in Sydney?”.


Luckily, one of the Japanese supermarkets in Artamon carried some dry Koji and I was able to prepare it at home!


Miso is supposed to be made during the cold season in Japan(Around October to March) and ready by autumn. I am following the Japanese calender but since the season is completely opposite, I was a bit worried how my miso would turn out.


When I did the “Tenchi-Kaeshi”, which means flipping the miso “up-side-down”, it looked OK, a bit softer than what I usually make.


I have to rest this for 3 more months before I can eat it. Hopefully, we can enjoy home-made miso this year!


If you are interested in making miso, I might do a miso-cooking class this year! The only problem would be that you won’t be able to eat what you’ve made for….6 months! It takes time, but this time gives it great taste, just like wine 🙂

Tags:
June 15, 2012

Flower Sushi to brighten your plate

by 田草川(たくさがわ)かおる

Hi this is KK, Sushi Artist / Healthy Muffin Maker / Mum 🙂

Thank you for visiting my blog.

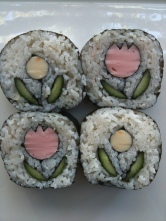
20120615-124548.jpg June is half gone already, time flies, doesn’t it? The weather hasn’t been so great, and I thought something like this would cheer you up on a rainy day.


Flower Sushi Art!!

In this month’s Sushi Art class, we are making simple flowers to make your plate very pretty.  If you are interested, please join me  in my class 🙂


Hope to see you soon!


June 15, 2012

Vegan banana custard tart

by 田草川(たくさがわ)かおる

Hi this is KK, Sushi Artist / Healthy Muffin Maker / Mum 🙂

Thank you for visiting my blog.


I was reading a blog of a girl who was doing a Pâtisserie Certificate at Cordon Bleu in Japan.

She was explaining all the techniques she was learning during the course, and inspired me to cook something more creative and usual. Fortunately or unfortunately, I don’t have the tools nor the ingredients (i.e: tart tins, cake tins, caster sugar, butter etc) to make something too fancy, and the furthest I could go was this vegan tart.

20120615-124442.jpg It looks more complicated than what I normally cook, but it’s not as difficult as it seems. Just break it into several steps (it doesn’t all have to be done in the same day!) and you can make your own tiny finger sweets!

It is composed of two parts:

1)Vegan tart base

and

2)Soy custard

You can decorate it with any fruit you like, strawberries, oranges, raspberries, or even a mix. My 20 month old daughter Yumi loved it, but she licked all the cream out before eating the base! It was kind of a mess after our morning tea, but if it’s tasty, that’s all that matters.


I don’t have a mini tart tin, so I used my regular muffin tin. I did not line it with paper or oil, but the base came out just fine.


Ingredients (to make 12 regular muffin tin size tart base + extras to make yummy crackers)

-30g Almond meal

-100g Organic plain flour

-120g Organic wholemeal flour

-Pinch of salt

-60g Oil (I used rice bran oil)

-60g Water

-2 Tablespoon Organic maple syrup


Step 1: Put all the dry ingredients (flours, almond meal, salt) in a food processor and mix on high for 30sec, add wet ingredients (oil, water and maple syrup) and mix on low for 30 sec. Put the mixture out onto a wrap and form a  small square, let it rest for 30min.


Step 2: Roll the mixture onto a table (with a mat, if you have one) and roll it out thinly (about 3mm) Cut it out with 11cm radius bowl or a cup and spread it into the muffin tin. Bake on 190 C preheated oven for about 12min.


Now your base is done!


Soy milk custard (to fill 12 tart)

-250ml Organic soy milk

-4 Tablespoon glutenous flour

-1-2 Tablespoon maple syrup

-1 teaspoon Organic vanilla extract


Step 1:Pour soy milk and maple syrup into a small pot, shift in flour. Cook on low heat for 5-8min, constantly stirring with a wooden spoon, when the mixture is firm and  is “pulling off” from the bottom, add vanilla and mix. Let it cool.


Now the custard is done!


All you have to do is assemble them. Drop a spoonful of custard into the tart base, and decorate it with your favorite fruit. The base and custard can be made a day before you plan to eat it, if you have leftover custard, just have it with your toast of pancake or whatever you like! Yumi loved eating the cracker I made from left over tart base mix. I think I will try it again soon myself so I will get used to making the base!

June 12, 2012

If you are visiting Japan, you must stay here

by 田草川(たくさがわ)かおる

Hi this is KK, Sushi Artist / Healthy Muffin Maker / Mum 🙂

Thank you for visiting my blog.

I suppose most people who visit my blog  are interested in either cooking or Japan, because that is what I write about. I’ve been introducing recipes of what I cook at home, but if you are lucky enough to visit Japan some time in the near future, there is one place that I would really recommend you to go.

It is a B&D&B (Bed and Dinner and Breakfast) place in Kyushu, the southern island of Japan. There is a family called Nonaka-san, and they live in this fascinating old Japanese house, in the middle of nowhere (LOL). The husband is a farmer and a photographer, the wife is a cooking teacher, and I just love their food.


Keiko Karube has been cooking organic vegetarian food for years, and when you eat it, your body will yelp with joy! You will not believe she is only cooking with vegetables and traditional Japanese seasonings, because the taste of each dish is very rich in  flavor and texture. The love she puts in her cooking is recognized after the first bite.

“Cooking is subtraction, have belief in your ingredients and use your senses”

is what she taught me, and it is so true. (Her cooking book doesn’t have any measurements!)

I love her plates and cutlery as well, everything is so carefully chosen and is perfect match with what she cooked. It’s unfortunate that her cooking books are only available in Japanese, but just looking at it makes me happy because I know where the photos where taken (It’s more like a photo album, using their daily dishes and was photographed in their house!)

I met the Nonaka family about 5 years ago, and loved there place so much we kept in touch. Kyushu is far from Tokyo so I couldn’t visit them after my first stay, but I was fortunate to go again last year.


Their website is in Japanese only, but the photos are inspiring enough so please take a look.

June 12, 2012

Baked Cheese Cake

by 田草川(たくさがわ)かおる

Hi this is KK, Sushi Artist / Healthy Muffin Maker / Mum 🙂

Thank you for visiting my blog.


How was everyone’s long weekend? We went away for the first 2 days and on the 3rd day, had some friends over for lunch.

For afternoon tea, I decided to bake something simple yet tasty, using my 26cm tart tin!


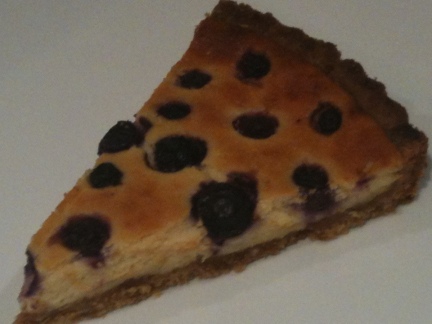
20120612-142415.jpg This is a very simple baked cheese cake, and I’m sharing the recipe because everyone who ate it loved it, including my husband Hide. He ate 3 slices of it, which is quite unusual because he doesn’t really have a sweet tooth.

The picture isn’t nice as I wanted it to be, but I promise it tastes delicious! And the best thing about it is that it’s really simple!


Ingredients for 26cm tart tin

<BASE> I used my Caramel Slice base for this

-150g Brown sugar

-60g Shredded Coconuts

-130 Organic Self raising flour

-100g Butter; melted

<CAKE>

-250g Cream cheese, at room temperature

-200g Full cream milk

-80g Organic Raw sugar

-40g Organic Self raising flour

-2 Tablespoon lemon juice

-Blue berries


Method

Step 1: Mix brown sugar, coconuts, flour and melted butter in a large bowl.Spread the mixture evenly onto the tin. Bake on 180C for 10min, let cool.

Step 2: Mix cream cheese and cream with your mixer until smooth (You can use electric beater if you don’t have a mixer) , add sugar and lemon juice and mix for 20sec, add flour and mix for 10sec. Pour into base, sprinkle blue berries.

Step 3: Bake in 170C oven for 30-40min, or until a skewer comes out clean. If you are using a smaller tin, it will take longer to cook because the cake will be “thicker” and require longer cooking time. I had to cover my tart with foil for the last few minutes because it was getting too golden, while the center was not cooked enough.


Everyone said the best part was the base (^-^), It is crunchy and chewy and sweet, so it goes well with strong black coffee! Please give it a try 🙂


June 6, 2012

Choc orange cookie in 20 min

by 田草川(たくさがわ)かおる

Hi this is KK, Sushi Artist / Healthy Muffin Maker / Mum 🙂

Thank you for visiting my blog.

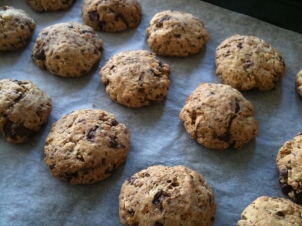
20120607-090614.jpg I ran out of muffins yesterday, and was planning to do another batch, but remembering there was some orange peel in the fridge, I decided to make a choc orange cookie instead!

This is is a modified version of my no-egg, no butter, no sugar cookie, and today, I didn’t even add maple syrup to it!  Because there is plenty of choc chip in it alreday, I thought, “Oh well, I’ll give it a miss” and the result was YUM YUM!


I have to wait till Yumi comes home (she’s at day care now) so she can taste test it.


But I can assure you it’s super easy, and everything (including the baking and cleaning) was done in less than 20min. So, if you need some snack to give your kids in a hurry, try this recipe!


Ingredients (to make 15 cookies)

-200g Organic plain flour

-100g Organic dark chocolate (with more than 70% cacao)

-1 teaspoon Aluminium free baking powder

-1 pinch salt (This is NEW!)

-2 Tablespoon Organic orange rind marmalade

-60g Rice bran oil

-70g Organic soy milk (I added extra soy to match the liquid consistency, if you want to add maple syrup to the recipe, you can do 30g Maple syrup and 40g Soy milk, like in my original recipe)


Method (Well, it’s one step)

Step 1:Pre heat oven to 180C; Put all the ingredients in the food processor and blend for about 30sec, or until the chocolate is chopped,  drop spoonful onto a baking sheet and cook in 180C oven for 12min.


While the cookie is baking, clean your bowl and everything is done! Hope you enjoy it 🙂


June 4, 2012

Black and White Chicken Burger

by 田草川(たくさがわ)かおる

Hi this is KK, Sushi Artist / Healthy Muffin Maker / Mum 🙂
Thank you for visiting my blog.

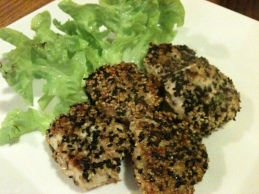
20120604-204104.jpg

Easy, yet tasty, tested and loved by my daughter Yumi!

This is chicken burger covered with black and white sesame. The sesame gives it taste and crunchness, and it does look kind of “special” too, doesn’t it?

I should have made a red sauce to make the plate prettier, but taste-wise, it was full of flavor. Will try again soon!


Ingredients (to make 12 bite-size burgers, enough for a couple and a baby,,, Yumi ate 4!)

-300g Free range chicken mince

-4 Shiitake mushroom

-2 Tablespoon shallots, chopped

-1 Free range egg

-1 teaspoon Soy sauce

-1 teaspoon Sake (cooking rice wine)

-1 pinch salt

-1 teaspoon Sesame oil

-Black and White Roasted sesame

-Oil to cook


Method:

Step 1:  Spread roasted sesame on a large plate and mix so that the 2 different colors are blended

Step 2:  Mix all the ingredients except the roasted sesame in a large bowl and mix well, drop spoonful onto the plate with sesame and cover on both sides

Step 3: In a large frying pan, heat oil (about 1-2 Tablespoon)on low to medium heat, place the burgers and put on a heavy lid. Cook for 2-3min, flip over and cook with the lid on for another 2-3min. Serve!


The  length of the cooking time will depend on the thickness  of your burger, and strength of your heat. It is quite full of taste, so no sauce required. Once the mixing get started, things will be a bit messy, so be sure to have your frying pan ready on the stove.


Hope you enjoy it!